California’s Low Carbon Fuel Standard Program

Last week Locus attended the first training session offered by California Air Resources Board (CARB) for verifiers under the California Low Carbon Fuel Standard (LCFS) program. The California LCFS program has been ramping up over the past several years, and is now ready to start certifying third-party verifiers to review both applications and routine reporting.

The LCFS program is part of California’s initiative to meet the AB32 requirements of reducing overall greenhouse gas emissions to 1990 levels by 2020, and 40% lower than that level by 2030. LCFS is specifically intended to address emissions from transportation fuels in California, which are approximately half of the overall emissions statewide. Like the Greenhouse Gas Mandatory Reporting Rule and Cap-and-Trade programs that preceded it, the California LCFS program uses a market-based approach to incentivize innovation and new approaches to reduce emissions.

LCFS Expert Seth Lalonde at the California Air Resources Board Training

Seth Lalonde, Locus Environmental Scientist, at the California Air Resources Board Training

The program covers a wide variety of projects, including production of alternative fuels (e.g. renewable diesel and biogenic compressed natural gas), innovative approaches to fossil fuel production and refining, and direct carbon capture and sequestration. Fuels are assigned a carbon intensity based on overall carbon dioxide emissions over the entire life cycle, from production to processing to shipping to consumption. The carbon intensity is essentially a measure of the emissions from the fuel per unit of energy. The lower the carbon intensity value, the less impact the fuel has in terms of carbon emissions. Certain fuels can even have a negative carbon intensity, which essentially means the fuel production process is absorbing more carbon than is eventually emitted to the atmosphere (such is the case for compressed or liquefied natural gas produced using biomethane from manure collection). The program also has impacts well outside the California border. After all, fuel that is eventually used in California can originate anywhere in the world, and the LCFS program allows for these projects to obtain credits regardless of their location.

Unsurprisingly, California was the first state to adopt and implement a LCFS program, and the first to establish a third-party verification program specific for LCFS. Although it was clearly the first presentation of this training material, staff from CARB as well as the Climate Action Reserve and The Climate Registry were on hand to assist in addressing questions and topics that weren’t covered in the prepared materials. And considering the wide variety of LCFS project types and the disparate backgrounds of attendees for the verification training, they did a great job of getting everyone all the information they needed to understand and verify these projects.

For those participating in the LCFS program or considering projects under the program, there are a few key things to keep in mind.

First and foremost, like any market-based emission program that includes a verification or auditing requirement, transparency is critical. The verifiers are trained to dig deep into your data, and not to take ‘no’ for an answer. Be prepared to have your metadata and documentation assembled and easily made available to the verifier. (For more on Transparency in Reporting, view this webinar)

Second, the LCFS program includes requirements for continuous or near-continuous monitoring for many parameters, and instrumentation capable of electronic data archival. Manual data records and transcription are still acceptable under other carbon offset programs, but under LCFS these options are no longer allowed. Be sure that your instrumentation is consistent with the specific LCFS requirements, or you’ll be seeing a non-conformance from your verifier.

There were many other tips and common pitfalls highlighted during the training for specific LCFS project types. Overall, I’m very excited to see how the LCFS program evolves in California, and how the energy industry takes advantage of these incentives to provide new options for transportation fuels that will reduce carbon emissions.

Update: Locus is now an approved verification body for the Low Carbon Fuel Standard. Learn more here.

[sc_button link=”/services/lcfs-verification/” text=”See our LCFS verification services” link_target=”_self” centered=”1″]

Mapping All of Space and Time

Today is GIS Day, a day started in 1999 to showcase the many uses of geographical information systems (GIS). To celebrate the passage of another year, this blog post examines how maps and GIS show time, and how Locus GIS+ supports temporal analysis for use with EIM, Locus’s cloud-based, software-as-a-service application for environmental data management.

Space and Time

Since GIS was first imagined in 1962 by Roger Tomlinson at the Canada Land Inventory, GIS has been used to display and analyze spatial relationships. Every discrete object (such as a car), feature (such as an acre of land), or phenomenon (such as a temperature reading) has a three-dimensional location that can be mapped in a GIS as a point, line, or polygon. The location consists of a latitude, longitude, and elevation. Continuous phenomenon or processes can also be located on a map. For example, the flow of trade between two nations can be shown by an arrow connecting the two countries with the arrow width indicating the value of the traded goods.

However, everything also has a fourth dimension, time, as locations and attributes can change over time. Consider the examples listed above. A car’s location changes as it is driven, and its condition and value change as the car gets older. An acre of land might start covered in forest, but the land use changes over time if the land is cleared for farming, and then later if the land is paved over for a shopping area. The observed temperature at a given position changes with time due to weather and climate changes spanning multiple time scales from daily to epochal. Finally, the flow of trade between two countries changes as exports, imports, and prices alter over time.

Maps and Time

Traditional flat maps already collapse three dimensions into two, so it’s not surprising that such maps do not handle the extra time dimension very well. Cartographers have always been interested in showing temporal data on maps, though, and different methods can be employed to do so. Charles Minard’s famous 1861 visualization of Napoleon’s Russian campaign in 1812-1813 is an early example of “spatial temporal” visualization. It combines two visuals – a map of troop movements with a time series graph of temperature – to show the brutal losses suffered by the French army. The map shows the army movement into Russia and back, with the line width indicating the troop count. Each point on the chart is tied to a specific point on the map. The viewer can see how troop losses increased as the temperature went from zero degrees Celsius to -30 degrees. The original thick tan line has decreased to a black sliver at the end of the campaign.

Minard's map

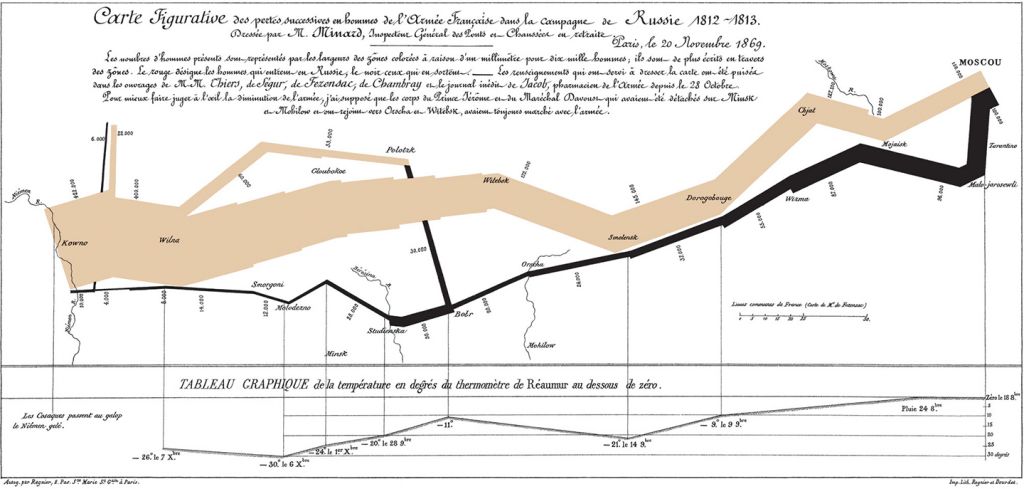
Charles Minard’s map of Napoleon’s Russian campaign in 1812-1813.

The Minard visual handles time well because the temperature chart matches single points on the map; each temperature value was taken at a specific location. Showing time changes in line or area features, such as roads or counties, is harder and is usually handled through symbology. In 1944, the US Army Corps of Engineers created a map showing historical meanders in the Mississippi River. The meanders are not discrete points but cover wide areas. Thus, past river channels are shown in different colors and hatch patterns. While the overlapping meanders are visually complex, the user can easily see the different river channels. Furthermore, the meanders are ‘stacked’ chronologically, so the older meanders seem to recede into the map’s background, similar to how they occur further back in time.

Alluvial Valley

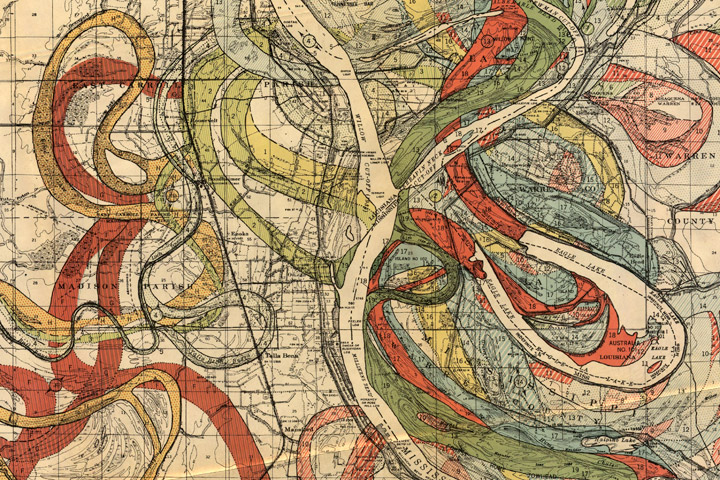
Inset from Geological Investigation of the Alluvial Valley of the Lower Mississippi River.

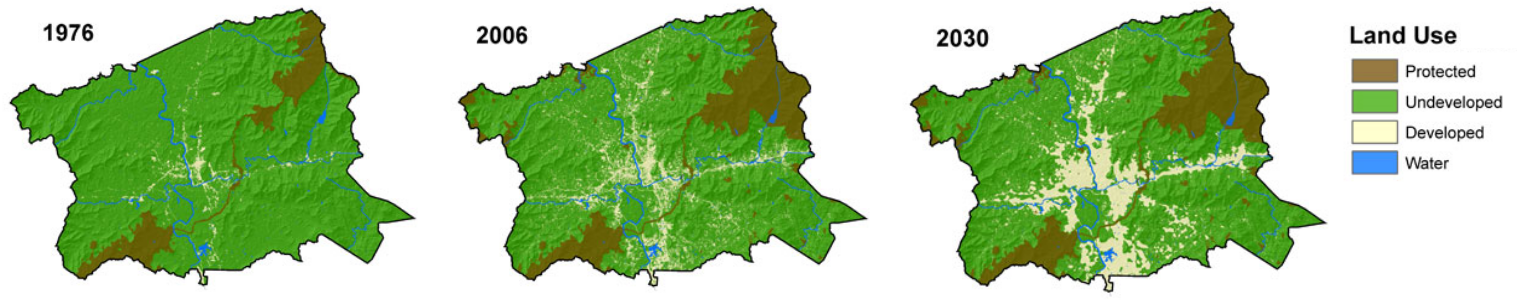
Another way to handle time is to simply make several maps of the same features, but showing data from different times. In other words, a temporal data set is “sliced” into data sets for a specific time period. The viewer can scan the multiple maps and make visual comparisons. For example, the Southern Research Station of the US Forest Service published a “report card” in 2011 for Forest Sustainability in western North Carolina. To show different land users over time, small maps were generated by county for three years. Undeveloped land is colored green and developed land is tan. Putting these small maps side by side shows the viewer a powerful story of increasing development as the tan expands dramatically. The only drawback is that the viewer must mentally manipulate the maps to track a specific location.

Buncombe County land use map

Land Use change over time for Buncombe County, NC

GIS and Time

The previous map examples prove that techniques exist to successfully show time on maps. However, such techniques are not widespread. Furthermore, in the era of “big data” and the “Internet of Things”, showing time is even more important. Consider two examples. First, imagine a shipment of 100 hazardous waste containers being delivered on a truck from a manufacturing facility to a disposal site. The truck has a GPS unit which transmits its location during the drive. Once at the disposal site, each container’s active RFID tag with a GPS receiver tracks the container’s location as it proceeds through any decontamination, disposal, and decommission activities. The locations of the truck and all containers have both a spatial and a temporal component. How can you map the location of all containers over time?

As a second example, consider mobile data collection instruments deployed near a facility to check for possible contamination in the air. Each instrument has a GPS so it can record its location when the instrument is periodically relocated. Each instrument also has various sensors that check every minute for chemical levels in the air plus wind speed and temperature. All these data points are sent back to a central data repository. How would you map chemical levels over time when both the chemical levels and the instrument locations are changing?

In both cases, traditional flat maps would not be very useful given the large amounts of data that are involved. With the advent of GIS, though, all the power of modern computers can be leveraged. GIS has a powerful tool for showing time: animation. Animation is similar to the small “time slice” maps mentioned above, but more powerful because the slices can be shown consecutively like a movie, and many more time slices can be created. Furthermore, the viewer no longer has to mentally stack maps, and it is easier to see changes over time at specific locations.

Locus has adopted animation in its GIS+ solution, which lets a user use a “time slider” to animate chemical concentrations over time. When a user displays EIM data on the GIS+ map, the user can decide to create “time slices” based on a selected date field. The slices can be by century, decade, year, month, week or day, and show the maximum concentration over that time period. Once the slices are created, the user can step through them manually or run them in movie mode.

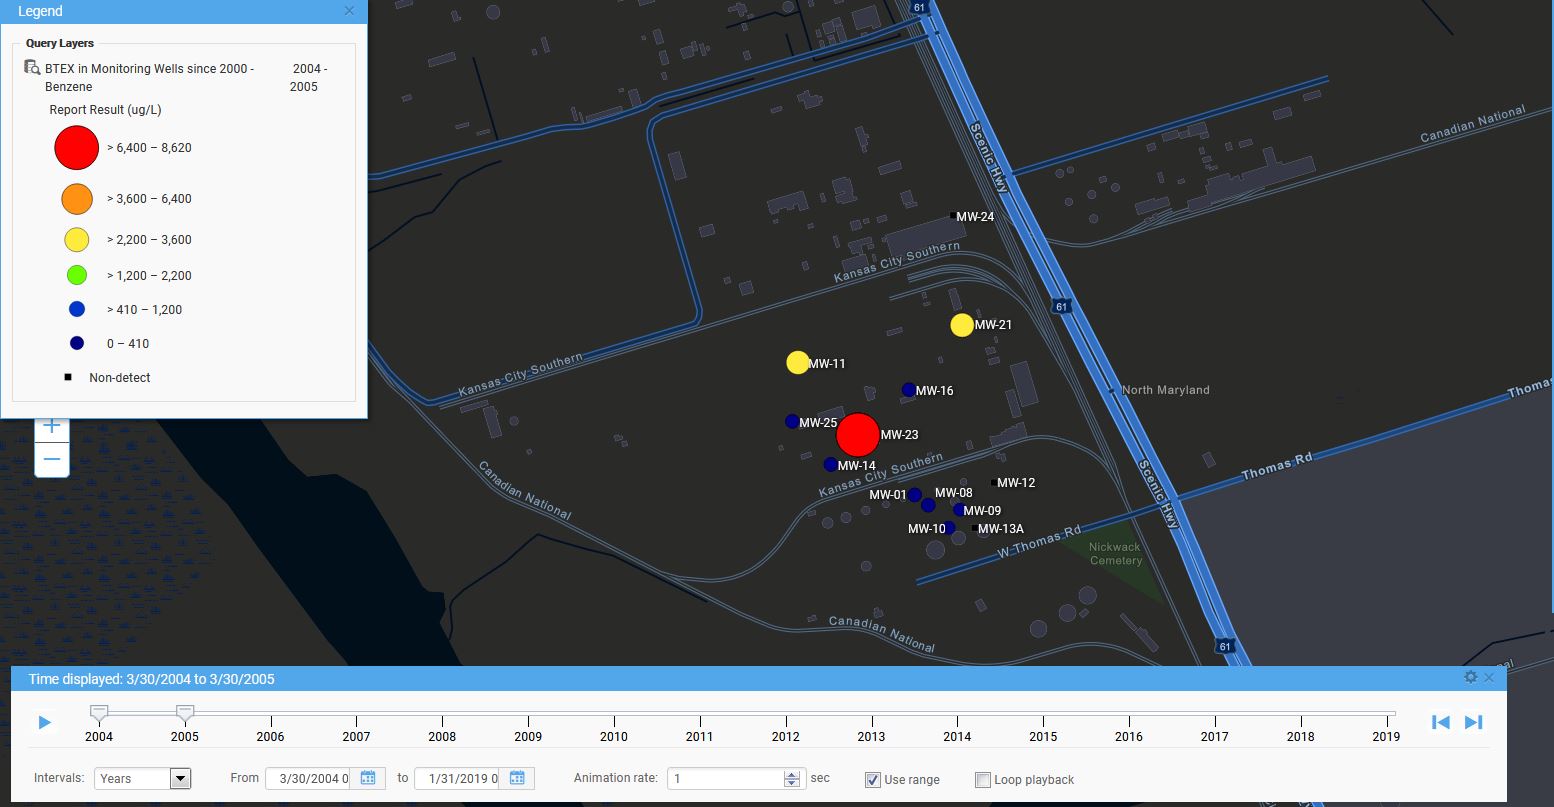
To use the time slider, the user must first construct a query using the Locus EIM application. The user can then export the query results to the GIS+ using the time slider option. As an example, consider an EIM query for all benzene concentrations sampled in a facility’s monitoring wells since 2004. Once the results are sent to the GIS+, the time slider control might look like what is shown here. The time slices are by year with the displayed slice for 3/30/2004 to 3/30/2005. The user can hit play to display the time slices one year at a time, or can manually move the slider markers to display any desired time period.

Locus GIS+ time slider

Locus GIS+ time slider

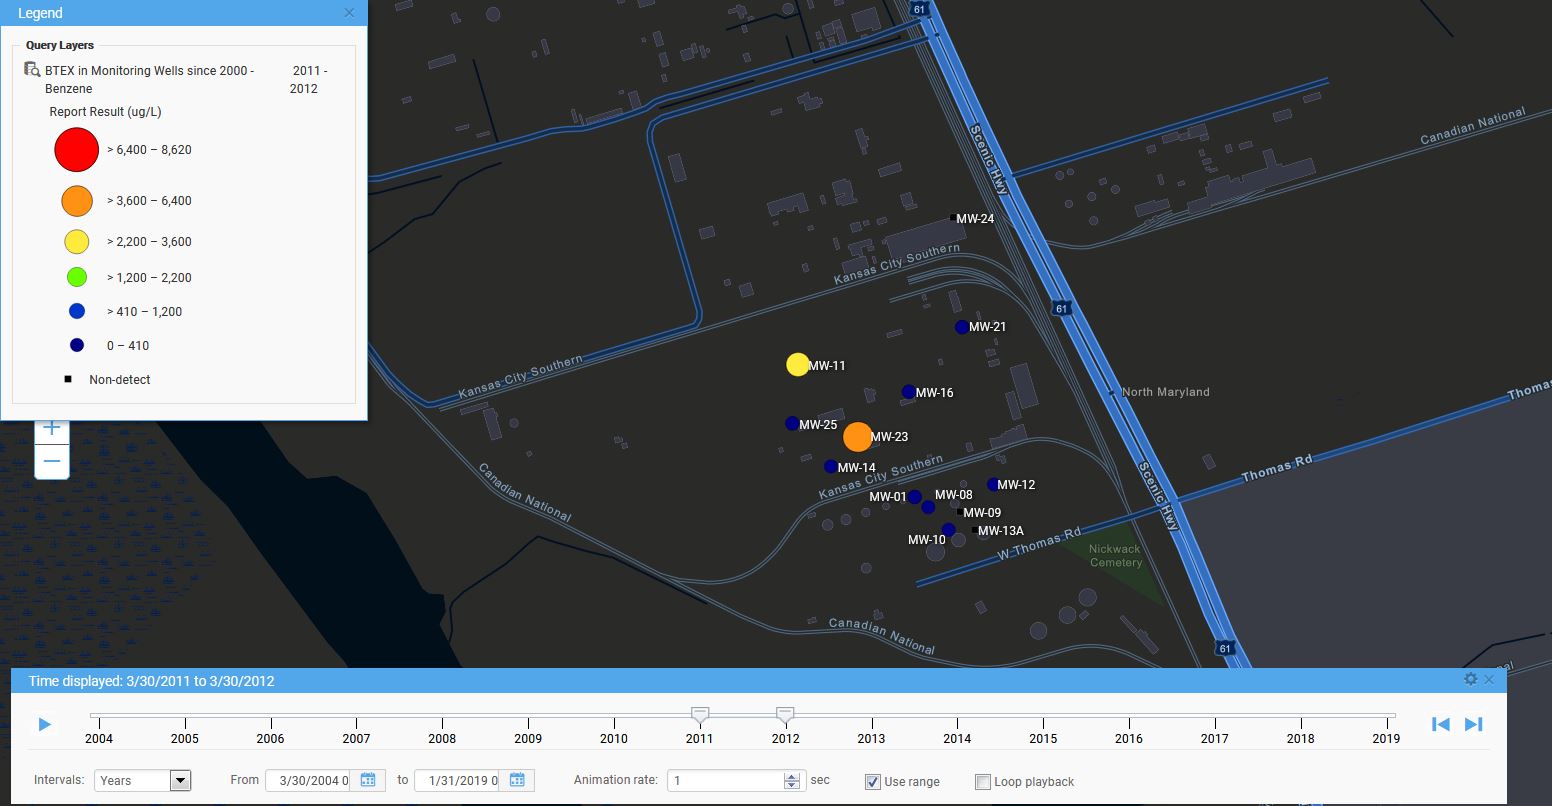
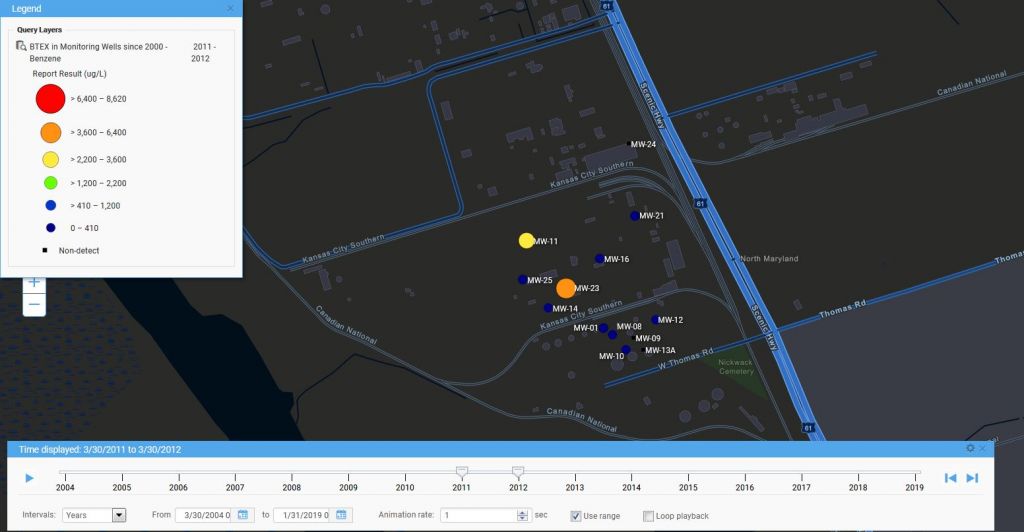
Here is an example of a time slice displayed in the GIS+. The benzene results are mapped at each location with a circle symbol. The benzene concentrations are grouped into six numerical ranges that map to different circle sizes and colors; for example, the highest range is from 6,400 to 8,620 µg/L. The size and color of each circle reflect the concentration value, with higher values corresponding to larger circles and yellow, orange or red colors. Lower values are shown with smaller circles and green, blue, or purple colors. Black squares indicate locations where benzene results were below the chemical detection limit for the laboratory. Each mapped concentration is assigned to the appropriate numerical range, which in turn determines the circle size and color. This first time slice for 2004-2005 shows one very large red “hot spot” indicating the highest concentration class, two yellow spots, and several blue spots, plus a few non-detects.

Locus GIS+ time slice

Time slice for a year for a Locus GIS+ query

Starting the time slider runs through the yearly time slices. As time passes in this example, hot spots come and go, with a general downward trend towards no benzene detections. In the last year, 2018-2019, there is a slight increase in concentrations. Watching the changing concentrations over time presents a clear picture of how benzene is manifesting in the groundwater wells at the site.

GIS+ time slider in action

GIS+ time slider in action

While displaying time in maps has always been a challenge, the use of automation in GIS lets users get a better understanding of temporal trends in their spatial data. Locus continues to bring new analysis tools to their GIS+ system to support time data in their environmental applications.

Time slice for a Locus GIS+ query

Time slice for a Locus GIS+ query

Interested in Locus’ GIS solutions?

Locus GIS+ features all of the functionality you love in EIM’s classic Google Maps GIS for environmental management—integrated with the powerful cartography, interoperability, & smart-mapping features of Esri’s ArcGIS platform!

[sc_button link=”https://www.locustec.com/applications/gis-mapping/” text=”Learn more about Locus’ GIS solutions” link_target=”_self” color=”#ffffff” background_color=”#52a6ea” centered=”1″]

[sc_image width=”150″ height=”150″ src=”16303″ style=”11″ position=”centered” disable_lightbox=”1″ alt=”Dr. Todd Pierce”]

About the Author—Dr. Todd Pierce, Locus Technologies

Dr. Pierce manages a team of programmers tasked with development and implementation of Locus’ EIM application, which lets users manage their environmental data in the cloud using Software-as-a-Service technology. Dr. Pierce is also directly responsible for research and development of Locus’ GIS (geographic information systems) and visualization tools for mapping analytical and subsurface data. Dr. Pierce earned his GIS Professional (GISP) certification in 2010.

Top 8 Things to Look For in Sustainability Software

Sustainability is a corporate necessity, and finding the right software to support company-wide sustainability goals and initiatives is imperative to streamlining this time-consuming activity.  This is especially true if you are managing inputs from many facilities/locations or have required or optional reporting requirements.  Not to mention, most corporate annual reports demand a summary of key sustainability initiatives as part of the corporate annual reporting process.

Here are some features to look for when selecting a sustainability software—to make sure your new software will actually help your company track and report its sustainability initiatives more accurately and efficiently.


1. Make sure software is accessible to everyone who needs to input data

 It is very important that data owners/data collectors throughout your facilities can directly enter their own relevant Key Performance Indicator (KPI) and greenhouse gas data—no more searching for data from disparate company groups, or searching through email for spreadsheets or invoices, and no more tracking down the field technician for the field log, or hunting for other assorted documentation.

This is especially important when dealing with company locations in various geographic regions. A well-designed software system can solve this most vexing problem: finding the relevant data.

 Check for the following features in any sustainability software you’re considering:
  • Data stored in one managed location
    All sustainability data should be stored in one place—whether text or numeric, and whether from an automatic data acquisition system, external database, hand-written field logs, or third-party documentation (e.g., air permits).
  • Streamlined reporting from centralized data
    Reporting is streamlined because all input is consolidated in one managed location.
  • Standardized terminology and units
    A centralized system enforces common terminology, units, and values (numbers vs. text) that are so important for final reporting. No one wants to get energy data from 10 different sources, all in different units, formats, and terminologies.
  • Built-in notifications and workflows
    Also, look for built-in reminders, notifications, and escalations to ensure the inputs are completed in a timely manner, and if deadlines are missed, you know exactly what is missing and who to contact.

Multiple data sources

Data can come from multiple sources, and your sustainability software should be able to handle them all—then consolidate this data into a single source of truth.


2. Make sure the software application includes quality assurance and third-party review tools

Any decent software can make data collection easy, but to truly improve your company’s sustainability initiatives, it must also have tools for quality assurance reviewers and third-party verifiers to easily review the information, track the reported values to source data, and understand how the data were processed.  Ultimately, the software also needs to allow the reporter to easily make updates or corrections as needed.  Because these data are reported to regulators or shareholders, accuracy is paramount.

Look for the following features to support transparency and auditing:

  • Visible and accessible calculations
    All embedded rules, queries, and calculations should be visible and traceable to anyone reviewing so they can check the calculations and raise a flag if issues are found.

    EPA equations

    Your sustainability software should make it easy to see and understand the formulas that produced any calculated data values.

  • Accessible and auditable source data and final values
    All source data and final reported values should be visible, traceable, and tracked. Watch out for “black box” calculations that will confound auditors and cost you in labor hours while you are determining how the reported value was obtained, what the data inputs were, and where the source data originated.
  • Complete audit trails
    Ensure audit trails are present for any changes in key data. You should be able to find out exactly who entered a value or who changed it. Be sure the software is keeping track and that everything is recorded and traceable to ensure the integrity of the process and reports. Good software will have an audit tool that tracks who did what, who is responsible for which datasets, and who changed which values and how.

3. Make sure the software includes tools for reporting to multiple regulatory or voluntary bodies

Many companies report to various regulatory or voluntary bodies, and the software you select should support all the major reporting requirements to avoid the need for separate calculations for some jurisdictions.

  • Enter once, report 10x
    Look for the concept of “enter once, report many times” when reviewing software applications. The gold standard is the capability for reporting methodologies and calculations configured for reporting to multiple agencies from a single dataset, all in a single tool.
  • Check support for your actual, specific needs
    Review your reporting requirements to see if the software handles them. Key reporting requirements include state or federal regulations, internal corporate social responsibility (CSR) and other sustainability reporting, the Carbon Disclosure Project (CDP), Global Reporting Initiative (GRI), and The Climate Registry (TCR).
  • Consider export formats
    Ensure the software includes exports to XML, which is a common format for EPA and ARB reporting, and an option for reporting to other agencies. Having such outputs easily generated from the software will save time and money during the reporting season.

Regulatory formats

Find out what formats you need for regulatory reporting, and make sure your software supports exporting in these formats.


4. Look for data verification flags so you don’t spend time fixing obviously bad data

If you normally report 500 metric tons of GHG per year and you are finding entries of 500,000 metric tons per year in your data, chances are, it’s just simple data entry errors.  However, no one wants to track these down months after the data entry event.  Look for software that will flag these anomalies on entry and force the user to fix them before you ever get to the data review step.

  • Ability to set validation rules
    Look for software that allows you to set rules to flag data entries that fall outside of expected thresholds, catching errors before they make it to QA personnel or auditors.
  • Options to specify acceptable ranges and add comments for unusual values
    Look for features that will help you avoid last-minute questions about the validity of your data. Look for the ability to specify an outlier range to flag values so that you can address them immediately before the report is due. Allow for the opportunity to enter a comment right alongside the flagged value, providing a record that the value was double-checked and is correct for a specified reason.

    Fuel warnings

    Immediate, inline alerts about outlier data values help prevent last-minute surprises.


5. Look for user-defined workflows to help you and your users step through sustainability reporting and tracking process

The sustainability software you select should help simplify data entry and reporting by supporting your preferred workflows.  Software with configurable workflows can be a huge help for both data entry personnel and managers reviewing data, by making the status of all data entry and reporting business processes abundantly clear.

  • Options for lockdown after manager review
    Look for the ability to include manager overrides to data entry and workflows that will lock the data entries to editing once reviewed. This will help ensure others are not modifying data while you are in the report preparation process.

    Edit workflows

    Options for managers to lock down data are important for preventing edits to data that is being prepared for reporting.

  • Quickly identify current workflow status
    Check for easy visual indicators of workflow status to ensure the process is on track to be completed by the reporting deadline.

    Workflow status

    There should be an easy way to see the current workflow status of any data in your system.

  • Easily modify workflow along the way
    Also look for the ability to easily modify the workflow if your original configuration was not optimal. Not everyone knows the best workflow for new software when they initially start using it.  The ability to modify the workflows—without needing a software developer—is an important feature to consider when choosing a sustainability software solution.

6. Look for robust audit trails to help solve “whodunit” issues

All software that handles critical or regulatory data should provide auditing on key data fields.  Find out the details of what is audited and how you will be able to access the audit information.

  • Full history of all changes
    Software should retain a history of values with every report change.
  • Who, when, what
    Look for a complete audit trail of who did what, and what was changed, and when. Tracking any modifications to values supports a rigorous audit and is sure to make your QC staff really happy.

    Workflow history

    Your software should be automatically recording a history of all changes at each step of your workflow.


7. Look at out-of-the-box data outputs—but also consider how easy (or hard) it will be to create specific reports for your corporate needs

Every software has built-in report and dashboards, but they may not meet all your needs out-of-the-box.  Assume some reports will need to be configured, and review the software accordingly.

  • Tracking specific KPIs
    Does the software provide an easy way to track year-to-year KPIs for internal evaluation or for preparation of public-facing sustainability reports?
  • Consider future reporting and visualization needs
    If you need a new report, chart, or other visualization of your data, will this request incur a custom software development charge, or is it an easy configuration?
  • Adapt dashboards to your needs
    Can you easily customize the software’s default dashboards?

    GHG emissions dashboard

    Look for options to easily configure reports, charts, and other visualizations that help you easily review summaries of your data.


8. Make sure the software has a robust notification engine

Software can shoulder the burden of getting people to do what they are supposed to do (reminders), alerting people to when an action is needed (notifications), sharing information (messaging) and sending them information (report notifications).  Be sure to review the strength of all notification features of the software, as this can be a huge help during reporting season—and it can lighten the burden on your inbox as well.

  • Multi-purpose notifications
    Look for routine workflow notifications to ensure you are notified when a workflow step is completed AND if a workflow step is ignored beyond the due date.
  • Actionable notifications
    Look for reporting notifications that will send the link (URL) to applicable users so they can quickly jump to the information in the software. No one likes knowing a report is ready, but then having to log in and search for it.
  • Group and individual notifications
    Ensure you can send notifications by individual user OR to user groups. It can be very tedious to select large numbers of individuals for routine notifications—it is much easier to select “all Facility XYZ EHS staff”.
  • Decide where to receive notifications
    Consider in-app messaging to keep important information in front of the users and spare their inbox.

Robust notification engine


Final thoughts: Imagine what implementation success looks like

While you are evaluating software options, use these points as a guide to make sure you choose a solution that will truly make a difference for your organization’s sustainability initiatives and reporting goals.

As more sustainability software solutions appear in the marketplace, it can be difficult for a company to discern which features really matter for its workflow.  Try a simple exercise—imagine what a perfect sustainability management business process would look like if you found the perfect software solution.  Consider the challenges you face now, and what it would look like if those problems were handled by your software.

Then, ask how well the sustainability software you’re considering will make this dream a reality.  The right software selection can help reduce operational risk, fulfill regulatory reporting requirements in less time and with less effort, and provide safeguards against bad data and missed deadlines.  All you have to do is ask the right questions.

The complete guide to evaluating EHS software

Get more tips for what to look for when evaluating EHS&S software!

[sc_button link=”https://www.locustec.com/white-paper/complete-guide-evaluating-ehs-software/” text=”Download eBook” link_target=”_self” background_color=”52a6ea”]